How To Make A Healing Crystal Candle

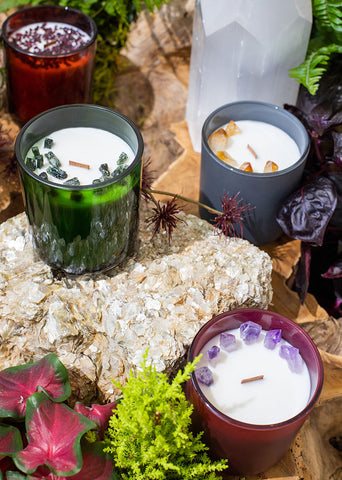
Crystals are a super fun way to add positive energy to your candles and home fragrance products.
Here at makesy, we offer a whole collection of colorful, enticing crystal points and mini chips that are sure to set your candles apart.
Citrine, amethyst, smoky quartz, peach moonstone, hessonite, black tourmaline, zircon...and so many more! They all have unique healing properties that you can infuse into your products for a boost of energy or a sense of calm.
In the steps below, we guide you through how to add crystals to the tops of your candles. You will want a special tool for this, our maker must-have, the heat gun. Make sure you have one before you begin.
To continue to play and design with crystals, try adding geodes to your candle lids. It instantly elevates any candle and makes for a mini work of art in your space.
Now go have fun with this unique enhancer and enjoy using crystals in all your products. We focus on candles below but you can also add crystals to your room sprays, body sprays, and all-natural hand sanitizer!
steps to make a crystal candle
1. First, make your main attraction, your candle! You can find steps to make a wooden wick candle here.

2. Choose your crystals. This part is so much fun!
You can get really creative and pick ones that offer meaningful energy or simply look pretty because of their gorgeous colors and translucent hues.
Take a look at your options here: the crystal collection from makesy.

3. Heat it up! Once you have the chosen ones, using a handy dandy, extra efficient heat gun, you’re going to wave it over the surface of your candle until the surface of the wax is liquified to about 0.2” or a finger nail’s worth.
Be extra careful not to wave the heat gun over your wick as the heat of the heat gun can potentially light it and start burning your wick.
Once the wax has melted enough, grab those crystals!
4. Add ‘em in. Start placing your crystals however you wish!
Some makers like to create designs like rainbows on top of candles, while others prefer to place a few crystals for a simple design.
However you decide to make with these intentional pieces of stone, they are going to make your candles look extra unique!
5. Touch up & let it cool. Take your heat gun and wave it over the surface of your candle to even out your wax in any places that need it.
Then, let it cool for about 15-20 minutes. And just like that, you’ve made a lovely crystal candle creation!
video tutorial
If you want to see this process in action, watch this video tutorial on how to make a crystal candle.
Ready to try making your own crystal candle? Head on over to the shop and find the crystals that speak to you and your candle collection.
Don’t forget to show off your magical creations on Instagram and tag us @makesy so we can share them!
Happy making!


