Money Maker Candle Kit
So you’ve got your money maker candle kit full of awesome candle making products in your hands… now what?
There’s a lot to consider as you’re building your brand and figuring the ins and outs of your new candle making business, but don’t worry… we’re here to help!
You’re not only going to become a creator of unique and innovative products, you’re also going to become a true business owner and that means taking the reins on branding, pricing, finances, and a whole lot more.
We suggest reading these instructions before you start making your actual products. Keep them handy throughout the making process as well.
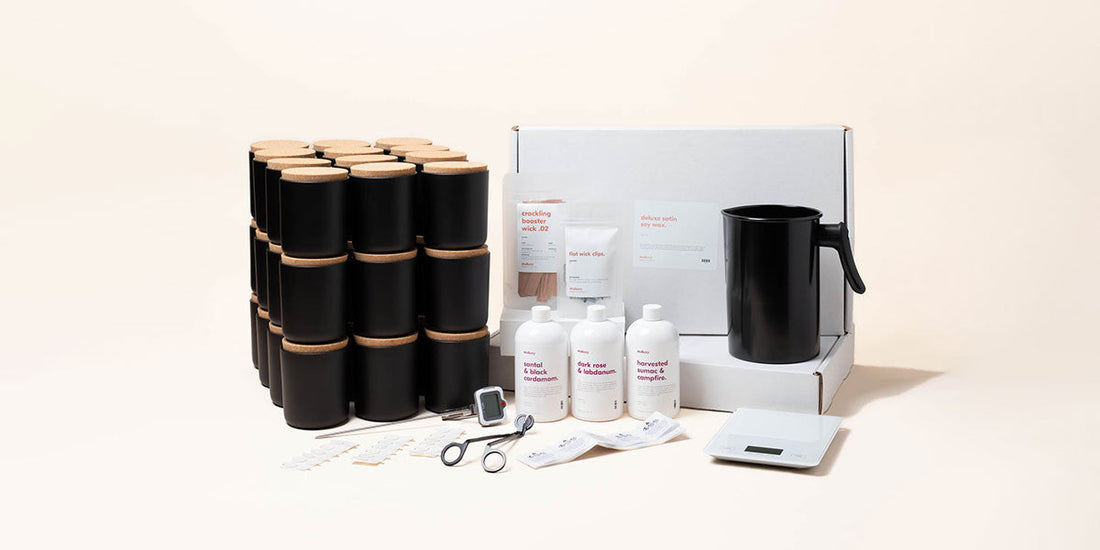
This kit will enable you to create 36 beautiful, luxury, highly fragranced candles with the best materials available so when you’re ready, let’s get making!

everything in your money maker candle kit
- The Burn Book (digital)
- 36 aura candle vessels
- 36 aura candle lids (metal or cork)
- 24 lbs of deluxe satin soy candle wax
- 3lbs of fragrance (your choice)
- 36 wood wicks
- 36 wick stickers
- 36 wood wick clips
- 36 warning labels
- 1 large black pouring pitcher
- 1 digital thermometer
- 1 digital scale
- 1 wood wick trimmer
candle making instructions
- Cover the area you will be working on just in case there are any spills or mishaps. We suggest using an old towel or sheet.
- Clean your vessels with a damp cloth and place a wick sticker on the bottom of the wick clip. Press your wooden wick into the wick clip. Then press the entire assembly into the center bottom of your vessel. Repeat until all vessels have a wick companion.
- Take out your digital scale, thermometer, large pouring pitcher, candle wax, and fragrances. Cut up your wax into pieces that can fit into the pouring pitcher. Use your digital scale to measure out 58.67 ounces of wax and place the wax into your pouring pitcher. You will complete this process a total of 6 times. Each “batch” will yield six candles.
- Time to melt the wax! Place your pouring pitcher into a pot filled with 2-3” of water, and heat until the water is simmering (not boiling). This will ensure your wax is melted evenly. Melt the wax until it has reached a temperature between 180-190° F, stirring intermittently, and do not exceed 200° F. Once you’ve reached the desired temperature, remove the pitcher from the heating source.
- Pick one of the fragrances from your kit and measure out 8 ounces in a disposable cup, using the digital scale.
- Time to add the fragrance into your liquified wax. Make sure to spend 2-3 minutes briskly stirring the fragrance into the wax.
- Carefully pour your wax + fragrance concoction into the vessel. Each melted batch of wax and fragrance should be distributed over six vessels. This will give you an approximate 11 ounce fill per candle, with a generous fragrance load. Be sure to pour around the wick, avoiding covering it in wax.
- Let your candle cool for at least 24 hours before handling. It’s important you do not shift the candle during the curing process.
- Once your candle is fully cured, trim your wick to 0.2” or 5.08 mm for optimal burn performance.
- Light and enjoy your candle!
If you’re more of a visual person, check out this video to see how a wooden wick candle is made.
how to sell your candles
Get that money, maker! Now that you've got 36 incredible finished candles, it's time to price, package and sell 'em! Here are some helpful tips to get you started.

You’re going to want to figure out your cost of goods sold (COGS) before determining your price points.
Watch this video to figure out your COGS, then this one on how to price your products.
Remember that pricing is branding!
As you’re figuring out how to properly price your products (we know this can be challenging!), keep in mind that your mindset is what determines your value.
By that, we don’t mean to only look at other prices of products in your market as a resource, but to also consider your efforts and the cost of those efforts.
For example, the quality of your products, how much time it takes to create them, your office/studio expenses, plus all the hard costs of your supplies.
Don’t underestimate your value! Your products are probably worth more than you think they are.
choose tech that can scale
Technology is an amazing asset for business owners and if you’re going to be selling your own products, it’s important to choose high quality pieces of equipment and programs that are designed to grow with you.
If you’re looking to buy a new computer to help you design marketing materials or store important business information, you’re going to want one that can do these things efficiently.
Starting a website? Choose one that fits YOUR needs and one that can grow with you as your business grows. Always think ahead and plan for future needs when it comes to tech purchases.
keep track of your finances
Keeping track of your finances may seem stressful, but it doesn’t have to be if you have the right tools. We highly recommend using quickbooks or excel as they are geared to help small businesses and startups.
There are also courses you can take online to help you learn how to use these tools effectively and efficiently so you’re not stuck trying to learn how to use them on your own.
Don’t be afraid to invest time and money in these types of resources as they will help make running your business a lot easier in the long run.
set up your website
If you’re not sure which website to use to sell your products, we have a helpful video that discusses the differences between Wix, Shopify, and Woocommerce.
Want to sell on Etsy? We have some insight here for that, too!
get picture perfect
You’re going to want to take marketable photos of your products as well. Here are some tips to perfect your product photos: 10 maker photoshoot tips.
For product photography inspiration, check out our #makesymadegallery where we spotlight other makers.
package your products
There are all kinds of ways to package your items. If you want some eco-friendly packaging inspiration, check out this blog for some great tips and tricks.
You'll also find a lot of packaging options here that perfectly fit our 12oz auras.

