How To Use Our Wax Melters & Melt Up To 19 Lbs At Once!
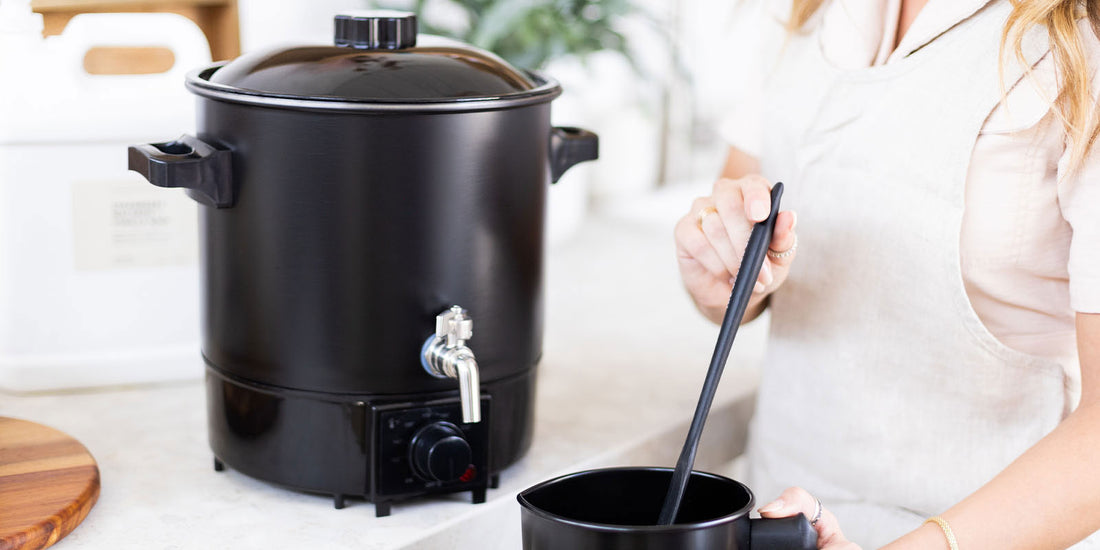
Have you seen our 9 liter and 27 liter wax melters? This maker tool is a wax melting game changer!
If you’ve already *added to cart* and made your purchase, you’re so close to top-notch efficiency when making your candles!
If you haven’t yet, you should know that it’s definitely worth the investment if you’re making batches and batches of candles at once.
You can even use Afterpay to make four interest-free payments! Keep reading to learn more about the wax melter’s features and how to use it safely.

wax melter features
- Choose from two sizes: 9 liter or 27 liter vessel with lid
- 9 liter melts up to 19 lbs / 9 liters of wax at a time
- 27 liter melts up to 59 lbs / 27 liters of wax at a time
- Includes handles on both sides
- Has a stainless steel body and pour spout for easy dispensing
- Suitable for most waxes with melting temperatures 50°C -100°C/ 122°F -212°F
- All makesy wax blends have been tested and approved to be melted in our wax melters at their corresponding melting point
- Using the 9 liter size, it takes between 90 minutes - 2 1/2 hours to liquify entire melter
- Using the 27 liter size, it takes between 2 and 3 1/2 hours to liquify entire melter
- Includes a thermostat control
- Light indicator
- Heat range for thermostat between 122°F TO 212°
- 110V/50-60HZ,1000W
- Standard U.S. outlet plug
safety guidelines
Check out these safety guidelines as you get ready to melt more wax than ever before:
- Always use protective eyewear and protective clothing when using the wax melter like these here - pink safety glasses + clear safety goggles
- Do not set the temperature control dials to a temperature higher than the manufacturer's recommended temperature for the wax you are melting.
- This product is intended for melting wax for candle making and is not tested for any other use.
- Turn the power off and remove the plug when the appliance is not in use and before cleaning. Do not clean when appliance is hot.
- To prevent damage to the appliance, do not use household cleaning products.
- It is recommended to remove excess wax and then use a lightly damp, soft cloth with rubbing alcohol to clean residue.
- Do not use your appliance with an extension cord unless this cord has been checked and tested by a qualified technician or service person.
- Always use your appliance from a power outlet of the voltage marked on the appliance.
- Do not use near chemical plants, petrol stations, fuel storage, or similar places, where an electric discharge could cause a fire.
- Do not touch the metal body of the melter heated parts when the appliance is in use.
- Operate the appliance in areas with sufficient air circulation, avoid overheated areas, and keep away from explosive or highly flammable materials.
- Do not put near objects sensitive to magnetic fields like credit cards.
- This appliance is not water-resistant so DO NOT submerge in water or any other liquid.
- Do not use the appliance in areas with extreme temperatures - keep away from direct sunlight and places with high humidity.
- Be careful when handling and lifting the lid during use, as the heat can result in burns.
- Note that high heat/overheating may damage the original properties of the wax.
- Do not leave your melter unattended while in-use.
- Do not leave children unattended, burns might occur.
- For any medical emergency, please contact 911.

melting your wax
Wax melting time depends on the type of wax and the corresponding melting point. Melter comes with a thermostat sensor that reads temperature from the bottom of the vessel - the thermostat can be set between 122°F TO 212°F (temperature is kept within ± 5 °F).
- Plug melter into the power source.
- Make sure the lever on the pour spout is in the closed position before adding wax (knob faces to the right when closed).
- Add desired quantity of wax to the melter’s tank - No more than 19lb / 9L. Do not let wax fill to the top of the melter and make sure to leave at least half an inch of room.
- Place the lid on top of the melter and leave it in place as much as possible to conserve energy, speed melting, and the temperature of your wax.
- Set the thermostat dial to the desired temperature. The unit will heat up to set temperature. When the heating unit operates, the red indicator light will go on.
- Periodically check the wax temperature and adjust the temperature controls as needed.
- Stir the wax periodically to ensure all components are well mixed.
- When you're ready to dispense the melted wax, place your pouring pitcher under the pour spout and slowly turn the lever to the left to open.
- Turn the tap handle to the left to release wax from the unit.
- The closer to the center the lever is, the faster the melted wax will flow from the spout. Be careful of opening the spout too far because (HOT) splashing can occur. As you are pouring out your melted wax, you may want to reduce the temperature or turn the melter off completely to avoid overheating the remaining wax (only do this if you are dispensing all of the wax at once, otherwise the wax will start to cool off and you will need to reheat it).
- To turn off the appliance, turn the thermostat dial counterclockwise until it stops.
- Clean between uses/waxes with paper towels and a bit of rubbing alcohol, ONLY when wax melter has completely cooled. This will help to remove any dust or debris that may have entered the tank.
Note: When turning the unit on after your previous use, there may be a residue of wax in the tap and a small pipe connected to the top. You may use the low heat of a heat gun to blow heat onto the tap and neck to loosen and liquify the wax so be ready to catch some leftover wax if needed.
cleaning your melter
before cleaning:
- Do not immerse in water.
- Turn off the power and unplug from the power source.
- Always wait for the wax melter and contents to cool down before cleaning it.
- Never pour water into melter if hot wax still remains inside (this is a fire hazard).
- Remove excess wax and discard it in the trash, never in a sink.
- To prevent damage to the appliance use a soft cloth with rubbing alcohol to clean residue.
- Do not use steel wool or coarse scouring pads - this may damage the surface.
to clean:
- When your wax melter has completely cooled, remove any excess particles.
- Your wax melter should not be washed the way you would normally wash an appliance - you can clean residues of wax inside with paper towels and a little bit of alcohol. The outside of the melter can be cleaned with a cloth and alcohol or just water. The lid is the only component that can be washed with soap the same way you wash dishes.
- Remove stubborn spots with a plastic washing pad or sponge.
-
To rinse the pour spout, you can flush it out with hot water and a mild soap. Repeat this step if necessary to ensure the pour spout is free of debris.
WARNING: Although this can be done, by adding hot water you will melt the remaining wax and it will clog drains. Also, depending on the amount of wax, it might require a good amount of soap to clean it and break the oil molecules. See the full guide for more information on this aspect of cleaning. - Dry off with a soft cloth.
- To clean the outside of the melter, you can wipe it with a damp cloth.
Note: This information is a condensed version of the manual that comes with this product when purchased. Make sure you read through the entire instruction manual before operating your new favorite maker tool.

questions?
If you need help or more information about your wax melter, contact our customer service team here or on our website through live chat.
We hope you enjoy all the time you’ll save melting wax with this HOT new product! Show us how it makes your studio look extra sleek and set up for success by tagging us @makesy on Instagram.
Happy melting!


