


How To Make A Beeswax Candle

Interested in the art of beeswax candles? In this blog you will learn a little bit about the rich history of beeswax and how to make beautiful beeswax candles using our beeswax coco créme wax.
Beeswax candles have been used for more than 1,000 years. This wax is the substance secreted by honeybees when they construct their honeycombs. The wax is obtained by melting the empty comb in boiling water.
It is stickier than other waxes and its composition varies slightly according to the geographical location and diet of the bees.
why use beeswax for candles?
Beeswax is a relatively soft wax, but has a high melt point. It is the most expensive of candle waxes, and is valued for its slow burn, golden color and unique aroma. Beeswax is available in yellow or white (bleached) color.
In this post, you will learn how to make a luxury beeswax candle using our beloved beeswax coco créme wax. This wax has been formulated for excellent scent throw and glass adhesion and it’s even suitable for use in massage candles!
It is made from a proprietary combination of ethically sourced beeswax, and renewably coconut, soy, and palm waxes and is 100% Natural, toxin-free, gluten free, skin safe, free of parabens and phthalates.
In just 8 simple steps, you can make your very own luxury beeswax wooden wick candle.
Let’s get started!
what you'll need to make a beeswax candle
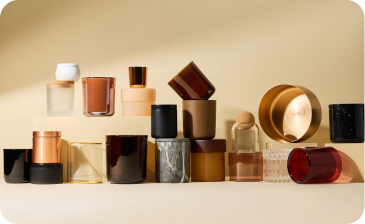
Here's everything you'll want to gather before you get started.- Candle vessels
- Beeswax coco créme wax
- Fragrance oil
- Wooden wicks
- Wick clips
- Wick stickers
- Safety labels
- Pouring pitcher
- Wax melter or stove-safe pot
- Whisk or stirring utensil
- Thermometer
- Wick trimmers
heat up your candle wax
Cover the area you will be working on. Clean your vessel with a damp cloth. Fill a wax melter or stove-safe pot with water until the water reaches approximately 3” (12.7cm) height. If using a stove-safe pot, pre-heat the water until it is barely simmering (not boiling).
prepare your candle wax
Beeswax coco Ccréme is formulated with a combination of coconut, soy and palm waxes for a clean, even burn and single pour… meaning you don’t have to worry about sink holes, uneven surfaces, or shrinking after your wax has been poured.
Divide your wax into small chunks with a wax cutter or knife and place them into a pouring pitcher. The total ounce fill of each vessel is equivalent to the amount of wax needed per vessel. Example: 8 oz vessel = 8 oz of wax needed.
how much candle wax do I need?
If you want to determine the volume of wax you need for your vessel, you can fill a measuring cup with water to find how many ounces of liquid will fill the container. Or if you are using a vessel from makesy, you can just look on the product page on our website for the ounce fill for that particular vessel. If you are using flakes instead of a wax slab, you will need to weigh the flakes with a scale to determine the amount you need to melt.
Carefully place the pouring pitcher into your water-filled pot. Leave pouring pitcher in the pot until wax is completely liquified and has reached the appropriate mix and pour temperature for your wax type.
If you’re unsure on the mix and pour temperature for your wax, refer to the manufacturer or product page where you purchased the wax. The appropriate temperature for Beeswax Coco Créme is 137 F / 58 C melt point with an optimal pouring temperature of 150 F / 65 C.
preparing your wooden wicks
While your wax is melting, you will want to assemble your wicks and place them into the vessel. If you’ve never used wooden wicks before, they are really easy to use since they stand up straight on their own with the help of the provided wick clips.
For beeswax coco créme we recommend burn testing using the .03 crackling booster wick from the makesy because of the wax type.
Understanding the relationship between wicks, wax, and vessel size is the key to successful candle making with wooden wicks.
what's a burn test in candle making?
It’s important to burn test with each fragrance you use to ensure the optimal burn performance for each fragrance. To find recommendations on what wicks to burn test and what width to use for your vessel size, we recommend purchasing our wick sample kit and referencing the wick selection guide.
Press the wick into a wick clip by gently rocking the edge of the wick back and forth until the bottom is completely secured in the clip.
Then adhere a wick sticker to the bottom of the wick clip. Press the wick and clip into the center bottom of each vessel you are making candles with and you’re ready to get mixing!
check the wax temperature
Next, you will want to check the temperature. Use your thermometer to check the wax temperature. Once you’ve reached the perfect temperature 150 F / 65 C., it’s time to stir things up.
measure & mix in your fragrance oil
Remove the pouring pitcher from the pot using a heat resistant glove or oven mitt. Measure + pour in your fragrance oil and stir briskly for 2 to 3 minutes--this prolonged stirring will help the molecules of the fragrance oils bond with the wax molecules for consistent scent throw.
Refer to our Fragrance % Chart for exact details and fragrance measurements based on your desired fragrance load and the amount of total wax you are using for your candles.
get pouring
Next, it’s time to pour the candles. Slowly pour the blend of wax and fragrance into your vessel until between .500” (12.7 mm) - 1” (25.4 mm) of the wick remains above the wax, depending on preference and vessel size.
In bigger vessels, it’s normally best to leave about 1” remaining above the top of the vessel, but if you are using a votive or shorter vessel, .5” should be sufficient.
finishing your candles
Let your candles set on a flat surface for at least 72 hours. Once your candles have fully cooled, trim your wicks to 0.2” (5mm) above the wax.
Apply safety labels to the bottom of your candles and - voila! You’re officially a candle maker! Once you’ve created your candles, it’s important to make sure you properly care for and store your beautiful new creations.
how to take care of your candles
Make sure to trim your wick in between burns where the wood naturally breaks off to prevent sooting. You can trim the wick by gently pinching the burnt bits off with your fingers when the candle is completely cooled.
Never burn your candle for longer than 4 hrs. We recommend burning in cycles of 2-3 hours, until a full melt pool is achieved. This maximizes an even burn and maximizes the throw of your fragrance.
Want more Maker’s hot tips? Check out our youtube channel for all the latest Makers tips + tricks. We love sharing your creations! Don’t forget to share your creations and tag @makesy on Instagram or @makesyofficial on Facebook for the chance to be featured!
Happy making!

